Showing posts with label loveliness fair. Show all posts

Tuesday, April 15, 2008

Bluebells!

One of my favorite spring traditions is visiting the bluebells at Bull Run Park. Sometimes the whole family goes, but today it was just us homeschoolers. It was sunny but cool, a nice day to walk. The trail is easy but muddy (bluebells grow near creeks and flood plains), so we all wore boots (a lesson learned by experience!). My youngest blossoms:
I think I read somewhere (Please don't expect me to actually look it up; it's past my bedtime!) that this park has the largest stand of bluebells east of the Mississippi. Some years the blue haze seems to go on forever.

But it's not just about the flowers, of course. Flood and mud are part of the attraction!

Not that it's actually important to keep the water below the top of your boots! (We met friends at the park, and I must say that Joe was NOT the wettest child by the end of the outing, and MANY boots were filled up and poured out.)
Of course, life's not all rainbows and butterflies--Mom was a bit rough getting everyone packed up and out the door. There was some aggravation and yelling going on among the siblings, even at the park. But after the first hour, we all really did relax and enjoy our time together. That transforming power is just one of the wonders of God's beautiful creation. Happy spring!

Returning Friends

"Make new friends, but keep the old: one is silver, and the other's gold." I sang this countless times around Girl Scout campfires, and today it's reminding me of our herbs. We grow them right outside the front door where the light is bright and I'm most likely to remember to water them. ;-)

Every year we start parsley (for us and the Eastern black swallowtail caterpillars) and basil (for tomato salad and pesto) from seed. But before either is even planted, I have the excitement of welcoming my "gold" friends back.

Chives have a mild onion-garlic flavor that makes them a great sprinkle on potatoes or in pasta/rice/pilaf type side dishes, or with eggs. I just snip a handful, rinse, then snip or chop. They're so reliable and prolific that I've downsized from 4 clumps to 2, and last year was still able to divide and give some away to other gardeners. Here in Virginia they grow from spring through fall. Chive blossoms look like purple pom-poms, and last a long time in a vase; I'll try to remember to post a picture when they appear. We have peppermint and spearmint growing in separate corners. I hear tales of mint taking over gardens, but ours is enclosed by the house and sidewalk, so it has not been hard to control. I am actually not a huge mint fan, but we do like it in iced tea, and it's fun to casually munch on the leaves. Last year Len bought me three different types of thyme, and I am so pleased to see some of them back this year! I didn't know they are perennials. I really enjoyed using thyme last summer, mostly with chicken. I also made a pasta side dish with a mix of fresh basil, parsley, chives, and thyme. Yum!
I very much enjoy the flowers of spring, but these returning bits of green bring me a different (quieter?) joy. I am so happy to have them back.

P.S. Sue B. at Attaining Virtue is hosting the Loveliness of Spring Fair--Flowerpots.

Thursday, April 10, 2008

Simply Lovely Laundry

The third corporal work of mercy: To clothe the naked.

Colleen at Footprints on the Fridge is hosting the Simply Lovely Laundry Fair this week, which has got me thinking about our system.

I concur with Elizabeth that every family will have a unique way of keeping the laundry beast under control. I can't wait to read what others do, though, because I'm sure to find at least one idea that will make our home run more smoothly.

It may sound drastic, but the ABSOLUTE BEST thing we ever did about laundry was to move the washer and dryer. We moved into our brand-new house 14 years ago, and lived with the w/d in the small mud room between the garage and kitchen. It seemed a logical spot, but hauling full hampers and baskets up and down the stairs was not fun, especially during pregnancy. Sorting dirty clothes took place on the floor, visible from (and sometimes spilling out into) the kitchen.

Our master bathroom is a generous size, with a double sink, shower, and separate soaker tub. We decided to put the washer in there next to the tub. Len was able to do the plumbing work, hooking into the pipes that were already there. He went for the simpler solution of having it drain directly into the tub (from above), so I do have to wash it out before taking a bath. This is no hardship, because I rarely justify the time or hot water to soak there (and it's too deep and slippery to bathe children in).

We considered upgrading to a stackable w/d, but decided instead to put the dryer into our (not huge, but adequate) walk-in closet, which is actually in the bathroom too. We hired an electrician to rewire for an outlet to support the dryer, and then moved it upstairs (remarkably light!). We had measured several times to make sure that the closet door could open without hitting the dryer, but had neglected to see if said door was WIDE ENOUGH to actually fit the dryer through (it was NOT). Yikes! The next day included a life skills lesson for the children as they helped Len take down the molding, cut the dry wall, take up some tile, install a new, wider door, and build a new threshold. ;-) It's probably a blessing that we didn't notice the discrepancy ahead of time, as that might have put off the project indefinitely.

So I've enjoyed nearly a decade of having the w/d right there in my bathroom. There is room next to the washer for dark and light bins (actually kitchen size trash cans in two colors), and the children are pretty well trained to sort their dirty clothes. As our family has grown, we have added another upstairs hamper, which I carry and sort as needed. The mop bucket in the mud room holds laundry from the main level (tablecloths, dishtowels, rags), but almost all of our dirty laundry is generated upstairs. I'm downstairs most of the day, but it's easy to switch or start loads in the morning, during a diaper change, or any time I visit my room. If there is a big pile on the floor (not often), at least it's not on the main level. This move has saved me so much time and energy, and made laundry no big deal. I really don't mind doing the 1-3 daily loads that we generate here. (And about big families: we can fill a load or two every day, so each person can get by with fewer clothes. I can wear my favorite shirt two or three times a week, because it gets through the laundry cycle so quickly!)

There's not much left to say about our system:

  • I sort, wash, and dry. I could (should?) train the children, but I don't mind this stage, and everything turns over more quickly if the clothes are mixed, rather than having each person wash his own loads.
  • Hanging clothes go on hangers as they are pulled from the dryer. I'm in the closet, after all!
  • I bought a timer from King Arthur Flour to hang around my neck since I can't hear the dryer buzz anymore. I use it only for those loads that contain potentially wrinkling clothes.
  • The other clean laundry is dumped on my bed to be sorted by a teen into the multiple baskets (one per person/room).
  • Inspired by my husband who must have taken over one postpartum, we don't fold much into the baskets. Those who like folded clothes take care of it in the putting away stage. This sounds awful, but it works fine for jeans, pjs, underwear, sweats, etc. My husband is neat and orderly, so it's hard to believe this was his idea, but after looking at the state of the drawers, it does seem like wasted effort to fold.
  • I match the socks, and have a little drawer to hold those waiting for mates. Sometimes I do get behind. I know some families with wonderful sock systems (all the same, or different stripes, etc.), and maybe one of these days I'll try one.

Laundry is a basic homemaking skill. It's one of those things that just MUST be done, sooner or later, and sooner is so much easier. Once you have a system that works for your situation, it can become part of the natural rythym of your life.

Attitude counts, too. I think it was Mother Teresa who said, "Everything done with love becomes a prayer."

Thursday, March 6, 2008

Liturgical Wreaths

Lisa is hosting this week's fair: The Loveliness of Sacred Spaces. Check it out!

Last year, Elizabeth wrote about using candles of the appropriate liturgical color on her family's table. That inspired me to make wreaths to surround candles for our table's centerpiece.

I used a few online sources for information on colors, and borrowed Elizabeth's idea of using blue for Mary's feast days. We look at our Magnificat magazine to choose the color of the day--ordinary time is green, but we might use red if it is a martyr's feast. This encourages us to notice the changes and rhythm of the Church year. Even my second grader enjoys checking and changing the centerpiece, although right now it's purple every day. :-)
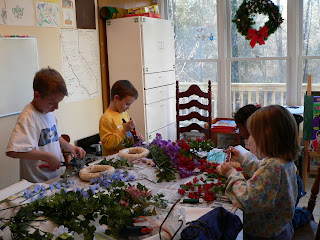
I bought straw wreaths at the craft store and wrapped them with florist tape (with a little hot glue at the end), partly to keep the straw from shedding, and partly for the green background. I bought flowers for the major colors, and green ivy garland, which I wired and glued in place. The homeschoolers and I worked together, snipping stems and gluing onto the wreaths. We generally put leaves on first, with flowers afterwards. Of course, the children needed supervision using the hot glue gun. Overall, the wreaths took several sessions to complete.I found an online store that sells large, unscented pillar candles. Unscented is worth looking for since the candle is lit at meal time. Another advantage is the quality of the color --beautiful shades that are solid throughout, not white candles dipped in color. You can see the purple one on my "Look of Lent" post below. At the craft store I also bought a rimmed glass plate in the candle section; the wreath fits on it perfectly. It also has little feet that make it easier to move around--great for table clearing time.
This was a fun project that would be easy to do in stages. It's really enhanced our awareness of daily life in the Church

Tuesday, March 4, 2008

The Look of Lent

Lisa is hosting this week's fair: The Loveliness of Sacred Spaces. Check it out!

Lent is long. Over the years we have incorporated some activities and many visual reminders to keep us aware and focused.Last year the children and I decorated wreaths in liturgical colors. The how and what and why will make another post, but here is the purple one we keep on the kitchen table all through Lent. I bought the gigantic unscented candle online. I like that it is solid purple, not a white candle dipped in color.

It isn't Lent here without our crown of thorns. Braided from salt dough (1/2 cup salt, 2 cups flour, water as needed) and filled with 250 toothpicks, it has a prominent place in the kitchen. The toothpicks represent our sins which are what Jesus suffered for. They are removed as good deeds, sacrifices, or works of mercy are performed. Hopefully emptied, the wreath is decorated with flowers to become an Easter crown and centerpiece, with a white candle in the middle.

There are sometimes questions about which good deeds are worthy of a toothpick, but for the most part, this is not a show-piece. We hardly ever see anyone else removing a thorn.
This is our prayer corner in the family room. The tea light is in a purple glass holder. We usually kneel and pray before the crucifix there. The Stations of the Cross book is new for us this year (We the similar rosary meditation book.), although we really haven't used it much yet.

Years ago a friend suggested covering our religious pictures and statues with purple cloth during Lent. We did that for a while, but I'd rather see them, so now I drape them with purple ribbon instead. I found a big roll (Costco!) with wire in the edges which makes the ribbon easier to shape. I save the big pieces from year to year (ironing lightly).
The ribbon was also handy for draping the grape vine wreath that hangs on the front door.
I laminated this print of Veronica's veil years ago, but it is more prominent this Lent. It was in the kitchen for weeks, but I think that over time we stopped "seeing" it. Now I've started hanging it on mirrors, moving it every few days. I think that will help keep the image fresh for us, and maybe give us each a moment of reflection.

Monday, February 25, 2008

The Loveliness of Cooking With Kids

Marianne is hosting the Loveliness of One-on-One fair about spending time with our children, one at a time. I had actually forgotten about the fair, but providentially began this post today. If you want to see what some of our meals look like, you can check some of these earlier posts.


Lately my posting makes it look like I do a lot of cooking with my kids. Fooled you! We had three meals in November, but didn't really start up again until February. The idea (ideal?) is to have each homeschooler plan and prepare a meal (usually dinner) monthly. I'm hoping we're back on the bandwagon and will keep going now. Here follow some random thoughts on how this works for us.

Life is usually too busy now for a weeknight meal, so step one is putting a date on the calendar, and that is almost always on a weekend.

Next comes the menu planning, and they are allowed to use some school time for this, but of course a child in regular school could do this with some free time. We sometimes make familiar dishes (after all, they don't know how to cook them yet), but they all prefer browsing through cookbooks for ideas.

We own a few children's cookbooks, but I get most from the library. At our branch, the juvenile nonfiction is mixed in with the adult (Dewey decimal 641 or 641.5), so I just walk by the shelves grabbing the ones with a "J" above the call number. As you browse you'll find many that suit your family. Current favorites include cookbooks by Emeril Lagasse. I haven't seen his show (apparently he's over the top!), but his children's books are great. The food is interesting and real, and the instructions are fine. As I mentioned last night, we sometimes edit for sugar, fat, or salt. I still remember a sweet potato casserole that was sweet enough for dessert even after removing much sugar and butter and all the marshmallows! So far we've used There's a Chef in My Soup! and There's a Chef in My World!, and apparently there are others.

The child chef and I review ideas and settle on a menu. This is the beginning of the educational side, because we cover some nutrition and basic menu planning (example: ham and sweet potatoes and canned fruit salad and bread and dessert and a sweet drink do not make a good meal). We also cover looks and flavors. Does the plate need something green or colorful? Are the flavors likely to go together? Are there too many difficult dishes to actually pull off? How will it be to serve (soup and salad and applesauce makes for many bowls)? You get the idea.

Once the menu is set, I go over the recipes, adding necessities to the grocery list. Sometimes the children help, and it would be educational for them to do it all, but it's just not practical for me. I know what we have on hand already, for one thing. I think I'll try to start involving them more in this step.

If we can, we do some prep the day or two before. When Daniel made ice cream, we cooked the custard base a day ahead. Joe is making dinner tonight, so last night we made his Swiss pasta sauce and put together the dry ingredients for the gingerbread.

Actually cooking is of course the heart of this activity, and I try to let the children do as much as they can. It takes a very conscious holding back/patience to let someone slower do something I'm very experienced at. I think this is what holds a lot of us back, but the rewards are great. These meals take a lot of time to prepare because the cooks are slower and also because they are more elaborate than a typical family dinner.

I have several different ways of interacting during cooking, tailored to the child, the recipe, and the time available. We read through all the steps together, then begin. I usually direct, especially if I change the way a dish goes together. The child chef may get training and then supervision of new skills--cutting, wisking, measuring, scraping, kneading, etc. Sometimes they can do a lot on their own, and I'm just the assistant--gathering ingredients, washing dishes and the counter, putting things away. Last night Joe browned the frozen pork by himself while I made plane reservations online. Then he gathered and measured for the gingerbread while I washed and tidied. Today we worked together.

Another perk of cooking a special meal is that the guest chef may invite a friend over to eat, and sometimes to help cook, too. Someone usually asks, but cooking doesn't get them out of their after-dinner chores. After all, I cook and help clean up on all the other days! ;-)

Saturday, January 26, 2008

The Loveliness of Soup Night

Last year I read an article in Sunset magazine that inspired me to host a neighborhood soup night. In fact, I had three before "soup season" was over. The main idea is to host a casual meal to get neighbors together. It's so easy to lose track of everyone--we're all busy, and not everyone has kids of bonding age.

Here are some guidelines for a successful Soup Night (most are from the Sunset article):

  • Pick a regular day and time, like the 3rd Monday of the month from 6-7:30. Making the time short (with a definite ending) made folks more likely to come on a weeknight, because they weren't commiting to much more than dinner time itself. I also tried to make it clear that drop-ins were welcome--coming from 6:30-7:00 was fine. I even had disposable coffee cups available for "to go" orders. One neighbor came, then drove her son to guitar (leaving another child with us), and came back later. Another dad came with his children then took soup home for his ill wife.
  • Deliver invitations and reminders. I wrote the first invitation explaining the concept (and listing three dates), and delivered them in person. Every month I delivered or dropped off a small reminder slip close to the day.
  • Invite everyone. I invited every family on our court, plus a few very close-by friends.
  • DO NOT REQUIRE AN RSVP. This was a little scary, but I think folks are more likely to come if they don't have to commit far ahead. My initial invitation stated that RSVP's were welcome, but not required. Most of the people who ended up coming did let me know ahead of time. The article says to expect 1/3 to 1/2 of those invited to attend. I added up the possibilities (about 52), and we had about 1/2 that each time.
  • DO NOT REQUIRE FAMILIES TO BRING ANYTHING. I provided soup, garnishes, and drinks (water, lemonade, tea--simple, inexpensive). I wrote that no one had to bring anything, but that they could bring bread or fruit if they wanted to. Almost everyone brought something. This is definitely hospitality rather than entertaining. It's a simple welcome and sharing, and the casualness and simplicity I think made folks more willing to come.
  • I always had 2 soups, but not the same amount of each. For our last evening I made a lot of taco soup (served with chips, cheese, sour cream, and sweet onions) and a smaller amount of cream of fresh asparagus. I love the asparagus soup (my children DO NOT), and I knew some adults would too, so it was a great chance for me to have that treat. I always made one of the soups vegetarian, but that might not be important for your neighborhood. As it turned out, I don't think my neighbors cared. :-) I brainstormed a list of possible soups (some in my repetoire, some from book browsing), and used that to inpire each month's choices.
  • Work ahead. Many soups can be made a day or two early (at least part way) or even made way ahead and frozen. Garnishes can also be prepped ahead. This does not have to be hours of last minute work, and if it were, how would you survive more than one Soup Night?
  • Keep the soups warm on the stove, label them, and let people help themselves. I used disposable paper bowls, but found we needed to double them because soup is hot!


We've had a beautiful but complicated life this fall and winter, and one of my biggest regrets is that we haven't been able to have Soup Night this season. I know some of my neighbors have missed it, too. A year off is a long time, but I'm hoping to start up again in the fall. It's not too late for you, though. Last year I read about Soup Night in January and hosted my first in February.

I haven't figured out how to upload a word document, so if anyone is interested in samples of my invitations or reminder slips, please send me an email. My address is LRice31 spam at cox dot net (take out the spam).

Tonight on my cooking blog I'm posting two of the simplest recipes I used (beef barley soup and taco soup). If I get ambitious later, I'll add the cream of asparagus and a yummy (and more popular than I expected) creamy clam chowder.

UPDATE (8/09): Some folks are still finding this post. FYI, there's a short follow-up here.

Sunday, October 21, 2007

The Loveliness of Apples


In the fall, it's hard to beat a perfect apple--cool, crisp, juicy, and sweet-tart. I rarely venture to orchards or farmer's markets these days, so those apples are mostly fond memories. Really fresh macouns and courtlands are the closest to ideal I've found lately.


Here's a recipe that's quick and tasty to make any time of the year, even with supermarket apples. I originally saw it on Danielle Bean's website, but last fall's archives were lost in a spectacular computer crash. This was submitted to Danielle by "Barb", and I've changed a few ingredients and the technique. It's now food processor quick and friendly.


Apple Cinnamon Coffee Cake

Topping
6 Tbsp flour
1/2 cup brown sugar
2 tsp cinnamon
1/4 cup butter

Cake
1 1/4 cups flour
1/3 cup sugar
1 Tbsp baking powder
pinch salt
1/4 cup butter
2/3 cup milk
1 tsp vanilla
1 egg
2 medium apples, peeled and diced
  • Grease and flour an 8" square or 9" round cake pan.
  • Mix dry topping ingredients in food processor. Add butter in chunks and process. Set aside.
  • Mix dry cake ingredients in food processor. Add butter in chunks and process. Add milk, egg, and vanilla, and process just until combined.
  • Pour over diced apples and stir together. This will be very thick, looking more like apples with coating than a typical batter. Spread in pan and crumble topping over it.
  • Bake at 400* for 20-25 minutes.
Notes:
  • You can add nuts to the topping. I process them first (about 1/2 cup of walnuts or pecans), then set aside. After processing the rest of the topping, I mix the two together.
  • If the topping is sandy in texture, squeeze it into clumps as you put it on the batter. This will keep the batter from covering it as it rises in the oven.
  • Granny Smith and Golden Delicious apples work well.
  • If you want to make more batches, don't add the wet ingredients to the food processor. Instead, after cutting the butter into the batter (Dr. Seuss, anyone?), stir that portion into the bowl of wet. I usually have the diced apple in a bowl of milk, egg, and vanilla (keeps them from browning, too).
  • You can do everything but the baking the night before. Just cover your pan with foil and refrigerate, then bake in the morning. Baking time will be increased.
In case you're wondering, that's a teenaged me at an apple orchard with my baby sister, who is now a grown-up mother herself. :-)